As is the case with many people, I probably spent more time than I should have playing the card game War as a child. Also like many others, I stopped playing once I realized there was no strategy or skill involved at all. But now, many years later, I am here to tell you that I was wrong, and War does have a strategy.
By far the most exciting part of a game of War is when there is a, well… War. For the unacquainted, this is when the players play equal cards, to decide the winner, both then place three cards face-down, then another one face-up as the tie breaker (repeating if the second pair of face-up cards tie). The winner takes all the cards, including the face-down cards. These are the only way Aces can change hands, as no card can beat an Ace outright, so they must be acquired as a face-down card or the card that was tied. Also, they in general involve many cards changing hands. For this reason, we want to optimize our performance in a War.
Okay, that’s all well and good, you may say, but how can we do that? Well, it turns out there is some player input in one aspect of the game: how you place the cards you win back into your pile. Whenever I had played, I put no thought into this, but upon looking at the dynamics of how Wars are played, you can come up with a method of placing the cards back into your deck that increases your chance of winning Wars that matter. Note that, to my knowledge, there is no way to make you win more Wars outright, but this strategy lets you win more Wars that have higher cards involved, while concurrently making you lose more Wars that have lower cards involved.
To understand the reasoning, let’s look at the form of a typical War:
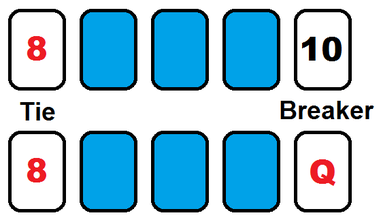
In this battle, the player on the bottom won with a Queen over a 10 after the two had tied on 8’s. As you can see, the winner of this War gets the two breaker cards, plus the four before them from either player. They cannot control their opponent’s cards, but they can control their own, to a small degree. After the first time through the deck, all cards in either player’s hand were won and then placed back into the deck. A vast majority of these are from standard, non-War, hands, and thus come in pairs, with one card being the high card and one being the low card. We will assume that our hand is entirely made up these pairs, ignoring winnings from Wars, as they greatly complicate things. Therefore, we can describe the hands as a series of high cards, H’s, and low cards, L’s, that come in pairs – one H per L. While all the H’s don’t have to be higher than all the L’s (a King beat by an Ace is then the L card, but is still high relative to all the cards), they are on average higher because each is higher than the L they’re paired with.
The point of this H and L talk is to clearly state our goal for placing cards in our deck: We want the H’s to come up as tie breakers for Wars that have more H’s in them already, and L’s to come up as tie breakers for Wars with fewer H’s. This way, we improve our odds on Wars that are more valuable to win. Let’s look at how to do that, by first looking at a randomly ordered deck. The colors denote which cards were won together:
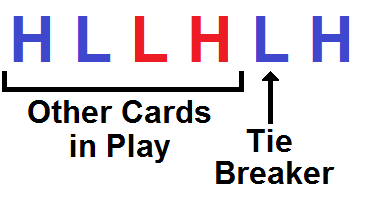
Here, the first H was the one that tied with the opponent, so it and the three cards after it are at stake when the tie breaker is played. What’s important to notice is that the ordering of the first two pairs doesn’t actually matter here, because the same four cards would be in the pot when the third L is the tie breaker (remember, we aren’t controlling when the Wars happen, just when we use our best cards as tie breakers). This will always be the case if the first card of a pair goes to bat as the tie breaker. So our strategy is only relevant when the second card in a pair is the tie breaker. Let’s take a look at that:
Now the order of the first hand is important because only one of those cards will be in the pot if the final H is the tiebreaker. As I stated before, we want H’s as tie breakers when there are more H’s in the pot. That means the first pair above is arranged incorrectly for this strategy. Let’s reverse that pair:
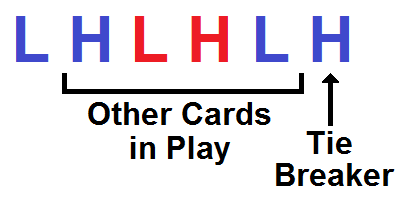
Similarly to the first hand shown, the arrangement of the red pair above doesn’t matter in this case because both cards are involved either way. The last of the four cards in the pot will always be an L because it is paired to the tie breaker, so the best we can do is making the first card in the pot an H, as shown. As you can see, all that you need to do is ensure that every pair is ordered in the same way as the pair two before it. There are two ways to do that: By placing the same card (H or L) on top each hand you win, or alternating which is on top each hand. Symbolically: HL HL HL HL or HL LH HL LH. This also extends to cases where a War requires multiple tie breakers, because the number of cards in the pot is always a multiple of 4 – the number of cards in two pairs.
To test this strategy, I made a simulation that would play War based on the two strategies above or random placement. Player A would either place randomly or use the HL HL strategy, and player B would either place randomly or use the HL LH strategy. I did 60,000 trial games, with each starting deal being played four times; one for every combination of A and B’s strategy. The results are below. For the record, a tie is possible, though highly unlikely, by both players having 26 cards and having a war which turns up equal cards each tie breaker until both decks are spent.
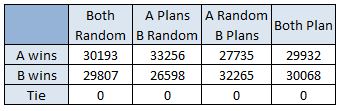
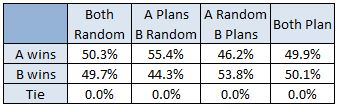
So the simulations showed an increase in winning percentage of about 5% if you use the HL HL strategy and 4% if you use the HL LH strategy. If both strategies are played against each other they can alter the outcome versus both players randomly placing cards, but the net outcome over many games is that the strategies cancel out. I can’t say for sure if A’s strategy is actually slightly better than B’s, or if there weren’t enough simulations for their outcomes to converge together. Either way, I would probably choose A’s strategy anyway because it’s easier to follow. A 5% increase in odds of winning isn’t bad for such a simple trick.
A final thought: this strategy doesn’t address what to do when you win a war. My simulation would group all 5 cards from each player together and order those as they would a normal pair, based on the deciding card: HL --> H(4 other cards from same player as H)L(4 other cards from same player as L). This could be a possible area of improvement to the strategy. I didn’t pursue it because it wouldn’t be as simple a move as the one this post was about, but I’m fairly certain you can do even better than 55% chance of winning if you use the right strategy there.
Write a comment